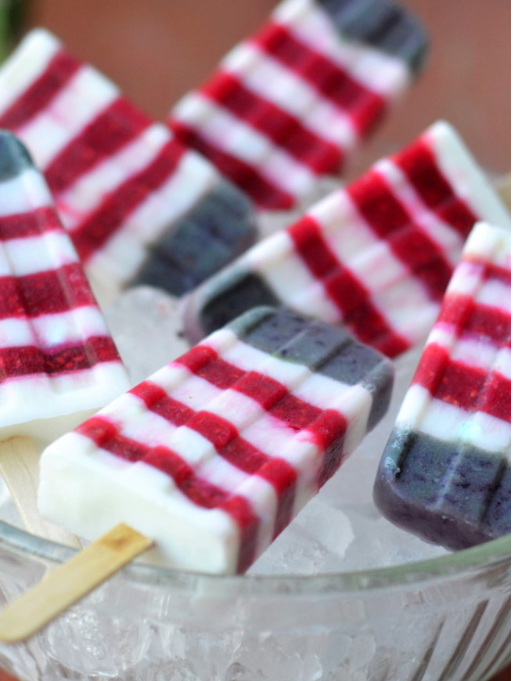
Ingredients:
(yields about 10 popsicles)
- 1 heaping cup raspberries
- 1 cup blueberries
- 1 cup vanilla flavored Greek yogurt
Instructions:
- Using a small 4 cup food processor, or blender, puree the raspberries until smooth. Set aside.
- Do the same with the blueberries. (If your blueberries are super purple, add a little blue food coloring.)
- Put the yogurt and each of the berry purees in small measuring cups with spouts. The goal is to thin them just a bit so they are pourable. Use water for the yogurt and the raspberries, and, depending on the color of your blueberries, you can use water, or yogurt if you need to brighten up your ‘blue’. Keep these cups chilling in the refrigerator when you are not using them.
- To layer your pops, start by pouring a little of the blueberry in the bottom of each mold. The only tricky part to these popsicles is getting the layers in without too much spillage to mar your stripes. (TIP: Don’t get too fussy, it should look rustic!)
- Put the mold in the freezer and freeze till firm, at least an hour, or more.
- Layer a little bit of yogurt into each mold for the next stripe. You will be able to see through the side of the mold to check your progress. At this point, cover the top of the mold with foil, and insert the popsicle sticks. Make sure to get the stick a little bit into the frozen layer so they will stand straight. Put back into the freezer until solid.
- Remove the foil at this stage, you won’t need it since the stick is in and you need to layer. Next comes your raspberry stripe, and so on until the molds are filled. Make sure to freeze each stripe until solid before adding the next. (TIP: Don’t worry if the stripes are uneven, but do try to clean up any dribbles as you go. I used a popsicle stick to scrape down the insides of the mold after each stripe.)
- Once filled and completely frozen solid, you can un-mold your pops. Fill the sink with hot water. Remove the foil, and immerse the mold just up to the lip, being careful not to let any water splash onto the top. Hold it for 30 seconds, remove, and try to pull the pops out. If they don’t slide out, immerse again for just a few seconds.
Helpful Tips:
- Sue recommends keeping the popsicles in the mold until you are ready to serve, or, if you are working in batches, wrap each popsicle quickly in waxed paper or put into a baggie and put back in the freezer. She doesn’t recommend making these more than a day in advance.
- Be sure to thin your purees, and your yogurt so that you can more easily layer them into the mold. If they are too thick, you will have trouble doing this neatly.
- The pure fruit melts fast, so don’t take them out of the freezer until you’re ready to eat them.
- Recommended popsicle mold: Norpro Ice Pop Maker. Sue does not use the plastic top that comes with it, though because it can get stuck when the sticks aren’t perfectly straight. She recommends using foil to cover, and simply sticking the popsicle sticks right through the foil.
The View From Great Island is a blog by mother and foodie Sue Moran, focusing on seasonally driven and eclectic recipes. Inspired by her tiny island town of New Castle (aka Great Island) off the coast of New Hampshire and the rich cultural mix of her family’s current home in Los Angeles, Sue uses her passion, colorful, and easy-going personality to bring her “real,” non-processed recipes to life.