Spring has sprung! Refresh your walls and channel your inner artist with 5 fun and easy DIY wall décor ideas along with a detailed step-by-step guide from Cantoni’s Visual Guru, Anne Mancuso!
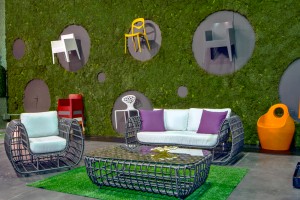
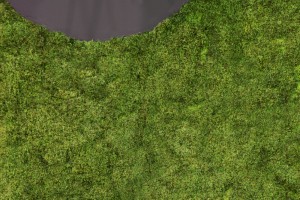
Moss Wall
What better way to really get into the “spring” of things than by adding a lush, moss wall? Bring the outdoors in with some greenery or reawaken your outdoor patio with either a live or fake moss wall.
What you’ll need:
- Moss (purchase in sheets so can easily break apart for preferred custom look)
- Foam Core Boards: Get as many needed for the size of the wall. (optional if it’s a permanent wall treatment)
- Spray Mount (3M Super 77 is best)
- Nails
- Hammer
- Drop Cloth (Will need for entire area…be prepared to get a little messy!)
Instructions:
Step 1: Measure the wall you are going to do the treatment on. If you are deciding to this on a wall that would like to change later this is important so changes can easily be made.
Step 2: Once measured, you can get foam core boards to fit the dimensions of the wall cutting any excess and making sure they are tightly positioned side by side. (This is optional if you wish for the wall treatment to be permanent.)
Step 3: Use a hammer and nails to position and place the foam core boards. A nail in each corner and one in the center should be enough to hold (if not, you can add as many as you see fit). Once the entire wall is covered, you can begin mounting the moss.
Step 4: Move doing one board section at a time, preferably starting with a corner and work your way over. Using the spray mount, determine how much of an area you need to spray at a time based on how big the moss sheet is. Spray the section of the foam board, then place the moss on top of the adhesive and hold until it is firmly stuck.
Step 5: Repeat these steps until the entire wall is complete and each section flows nicely. If you’re finding holes, you can patch them and blend with scraps of moss that are leftover from the bottom of the original box.
Important Note: If you decide to use real moss, you will want to make sure to be watering it. If you notice it’s starting to get a little brown or is drying out, fill up a spray bottle with water to mist the moss and bring it back to life.
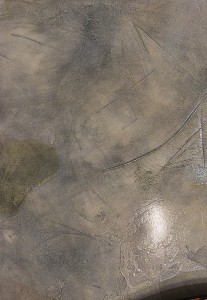
Faux Concrete Finish
The look of this unique, faux concrete wall is both contemporary and soft. It bodes well in urban environments, but complements warm, transitional spaces as well.

What you’ll need:
- Sherwin Williams Repose Gray Paint
- Sherwin Williams Dorian Gray Paint
- Sherwin Williams Faux Impressions Venetian Plaster
- Sherwin Williams Clear Glaze
- Black, Brown, and Charcoal Paint (only need small amount–any type of wall paint will do)
- Putty Knife
- 2 Paint-Rollers
- Mini-Size Roller
- Mud Pan
- Latex Gloves
- Finishing Trowel
- Drop Cloth
- Painter’s Tape
- Plastic (Paint) Containers
Instructions:
Step 1: Apply a base coat of the Sherwin Williams Repose Gray Paint using one of your paint rollers to cover the entire wall and your mini-roller to achieve a roller-finish at all ceiling and corner areas.
Step 2: To break up the solid gray base coat and add texture, make random slashes with the black, brown, and charcoal paint using the putty knife.
Step 3: Mix a small amount of the Dorian Gray paint into the Venetian plaster so that it is slightly tinted.
Step 4: Pour the tinted Venetian Plaster into a mud pan.
Step 5: Using the trowel, retrieve a spatula full of the plaster and apply to the surface in a thin, skimming motion with the trowel nearly parallel to the wall.
Step 6: Repeat this motion across the wall and create a thin plaster layer in small random “X’s.”
Step 7: Let first coat dry completely and then apply the second layer of Venetian Plaster with the same trowel, but this time at an increased angle to the wall. (Approximately 60 degrees)
Step 8: Allow the second coat to dry before you do Step 9.
Step 9: Mix half of the Sherwin Williams Clear Glaze and half of your original paint color (Repose Gray).
Step 10: Once the surface is completely dry, use your second paint roller and apply the mixed glaze to the entire wall. Mixing in the glaze gives the paint translucency, allowing what’s left of the “random slashes” to show through and the overall wall treatment to look like one substance.
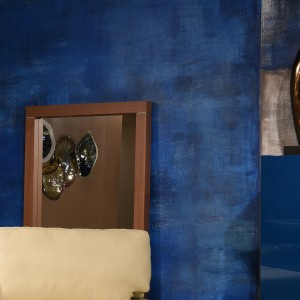
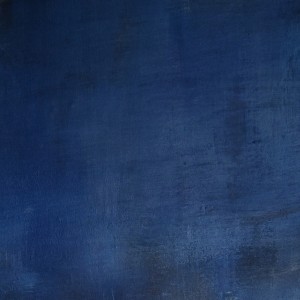
Faux Denim
Forget black and beige. Navy blue, the newest neutral is crisp, cool, and classic. The denim wall is a contemporary and unique take on this color trend.
What you’ll need:
- 1 Gallon medium tone blue paint of your choice in eggshell finish. (Anne used Sherwin Williams Blue Plate- 6796)
- 1 Gallon dark tone blue paint of your choice in eggshell finish. (Anne used Sherwin Williams Naval- 6244)
- 1 Gallon faux finish glaze
- Painting tray with 2 paint liners
- 2 Paint Rollers
- 8 inch wide straw hair brush
- Mixing stick
- Extra paint bucket or 1 gallon container to mix paint in
- Tarp to cover floors
Instructions:
Step 1: Using your paint roller, roll one coat of the medium blue paint on the entire wall. Let dry, and then you can add another coat if needed. After complete, let dry for 24 hours to ensure all paint is dry before glazing in Step 2.
Step 2: Next, take your extra paint bucket and put in equal parts dark blue paint and equal parts glaze. Using the mixing stick, mix until blended.
Step 3: Pour the mixture into your painting tray and using the paint roller, roll a light, even coat on the entire wall, keeping your 8-inch wide brush handy.
Step 4: Once complete, use your 8-inch brush to make even, horizontal strokes across the wall, starting at the top working your way down in sections.
Step 5: Do the same thing, but now turning the brush and making even, vertical strokes starting at one side and working over. (Some sections might need a few passes before you get your desired texture)
Step 6: Let dry for 24 hours (over night) after when you will discover a new, beautiful faux denim wall!
Ombre


What you’ll need:
- 3 different shades of paint (Anne selected purple, but can select your color of choice as long as you get 3 shades–see below!)
TIP: Although Anne decided to use all Sherwin Williams paints in a flat finish, she recommends an eggshell finish.
- Sherwin Williams Faux Impressions Glaze
- White Paint (will require a very small amount–See Step 4)
- Paint Roller
- Painter’s Tape
- Drop cloth
- 3 Spray Bottles (with extra nozzles–tend to get clogged during the process.)
- 2 thick, 5-6 inch brushes
- 2-3 Painting Trays
Instructions:
Step 1: Divide the wall you’re planning to paint into 3 sections: Light on top, medium in the middle, dark on the bottom.
Step 2: Tape off the edges of the wall you would like to paint and cover everything surrounding with the drop cloth.
Step 3: Using a paint roller, paint each section of the wall in one thick, clean coat. (It’s okay if the colors roll over each other, as this helps with the blending process)
Step 4: Let the colors dry while you prepare the next step!
Step 5: Now, you will begin preparing your 3 spray bottles. (keep the extra nozzles handy as the bottles can get clogged during this process) Bottle #1: Fill half with water, ¼ dark paint, and ¼ medium paint. Bottle #2: Fill half with water, ¼ medium paint, and ¼ light paint. Bottle #3: Fill half with water, ¼ light paint, and ¼ white paint.
Step 6: SHAKE WELL!
Step 7: Starting at the bottom with Bottle #1, begin spraying the bottom section where the dark and medium colors meet. It can be random as long as it looks well blended. Keep in mind, it will drip down a bit…let it drip. DO NOT WIPE! This helps with the overall blending.
Step 8: Repeat Step 7 but with Bottle #2 and squirt the middle section where the medium and light colors meet. Remember it’s okay if some of that mixture also drips down to the bottom–do not wipe!
Step 9: Take Bottle #3 to the very top of the lightest color and spray edge. Let paint drip down.
Step 10: Take a step back and see if there are any spots that need to be touched up. If not, go ahead and let dry overnight.
Step 11: Grab your two 5-6 inch brushes and two containers for mixing.
Step 12: In one container, mix 2 parts Faux Impressions Glaze from Sherwin Williams and 1 part dark paint.
Step 13: Beginning at the bottom, work the glaze upwards, blending everything together to create a smooth transition between the shades.
Step 14: In the second container, mix 2 parts Faux Impressions Glaze with 1 part light paint.
Step 15: Starting at the top, begin blending by working your way down to the middle section. (You’ll want all of the colors to have a smooth, gradual transition).
Step 16: Let dry and you’re all done!
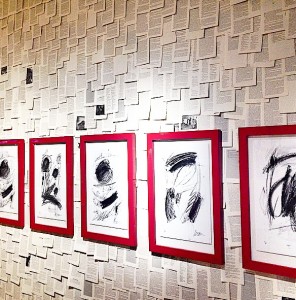
The Typography Wall
Last but not least, we have the typography wall, which was inspired by Anne and implemented by two of our talented designers at our Los Angeles store, Kyle Spivey and Gustavo Nachornik. Not only does this decorative wall allow for sentimental value but it wont make a mess either!
What you’ll need:
- Double Sided-Tape (if you want it to be temporary)
- Hot Glue Gun OR Hammer and Nails (for a more permanent solution–whereas hammer and nails is a bit more permanent and will leave marks, the hot glue gun is still sturdy but easy to peel off.)
- Prints of your choice! We tore out pages from various novels to create the look, but we encourage you to use any type of typography that means something to you. For example, it could be lyrics or sheet music from your all-time favorite songs, pages you’ve collected from various magazine, or even letters and articles you’ve personally written.
Instructions: Unlike the wall treatments mentioned above, this particular wall doesn’t require too many steps. While you can arrange your prints however you choose, here’s a few tips from Kyle how to get that layered, textured look.
Step 1: Start from the bottom of the wall and work your way up.
Step 2: Layer your typography in a shingle arrangement. Layering is KEY!
That’s really all there is to it!
Questions or concerns? Feel free to ASK ANNE in the comments below! You may also find throughout your wall-decorating process, your own tricks and we’d love to hear them! Share in the comments below and feel free to tweet or instagram us a picture of your fabulous DIY walls @cantonidesign!